I recently tested upgrade kits from Retro Game Restore for the original Famicom. I really think most people who own the console would be interested in the rear board, regardless of signal output – It’s a clean install and I LOVE the sound upgrade (more info below). And if you plan on using composite video instead of doing an RGB mod, I strongly recommend the very easy composite bypass as well. Lastly, RGR also offers an entire replacement motherboard, if yours is damaged or no longer working. The livestreams at the top and bottom of this post show everyting in real-time, however it’s all summarized under the links:
Rear Board: https://retrogamerestore.com/store/famipoweradapter/
Composite Bypass: https://retrogamerestore.com/store/famicompositedapter/
Full Replacement Motherboard: https://retrogamerestore.com/store/fc_hvc_cpu07/
Clear Cases (all linked in this post): https://www.retrorgb.com/retro-game-restore-transparent-red-nes-shells.html
Clear Controller Shells: https://www.retrorgb.com/clear-famicom-controller-shells.html
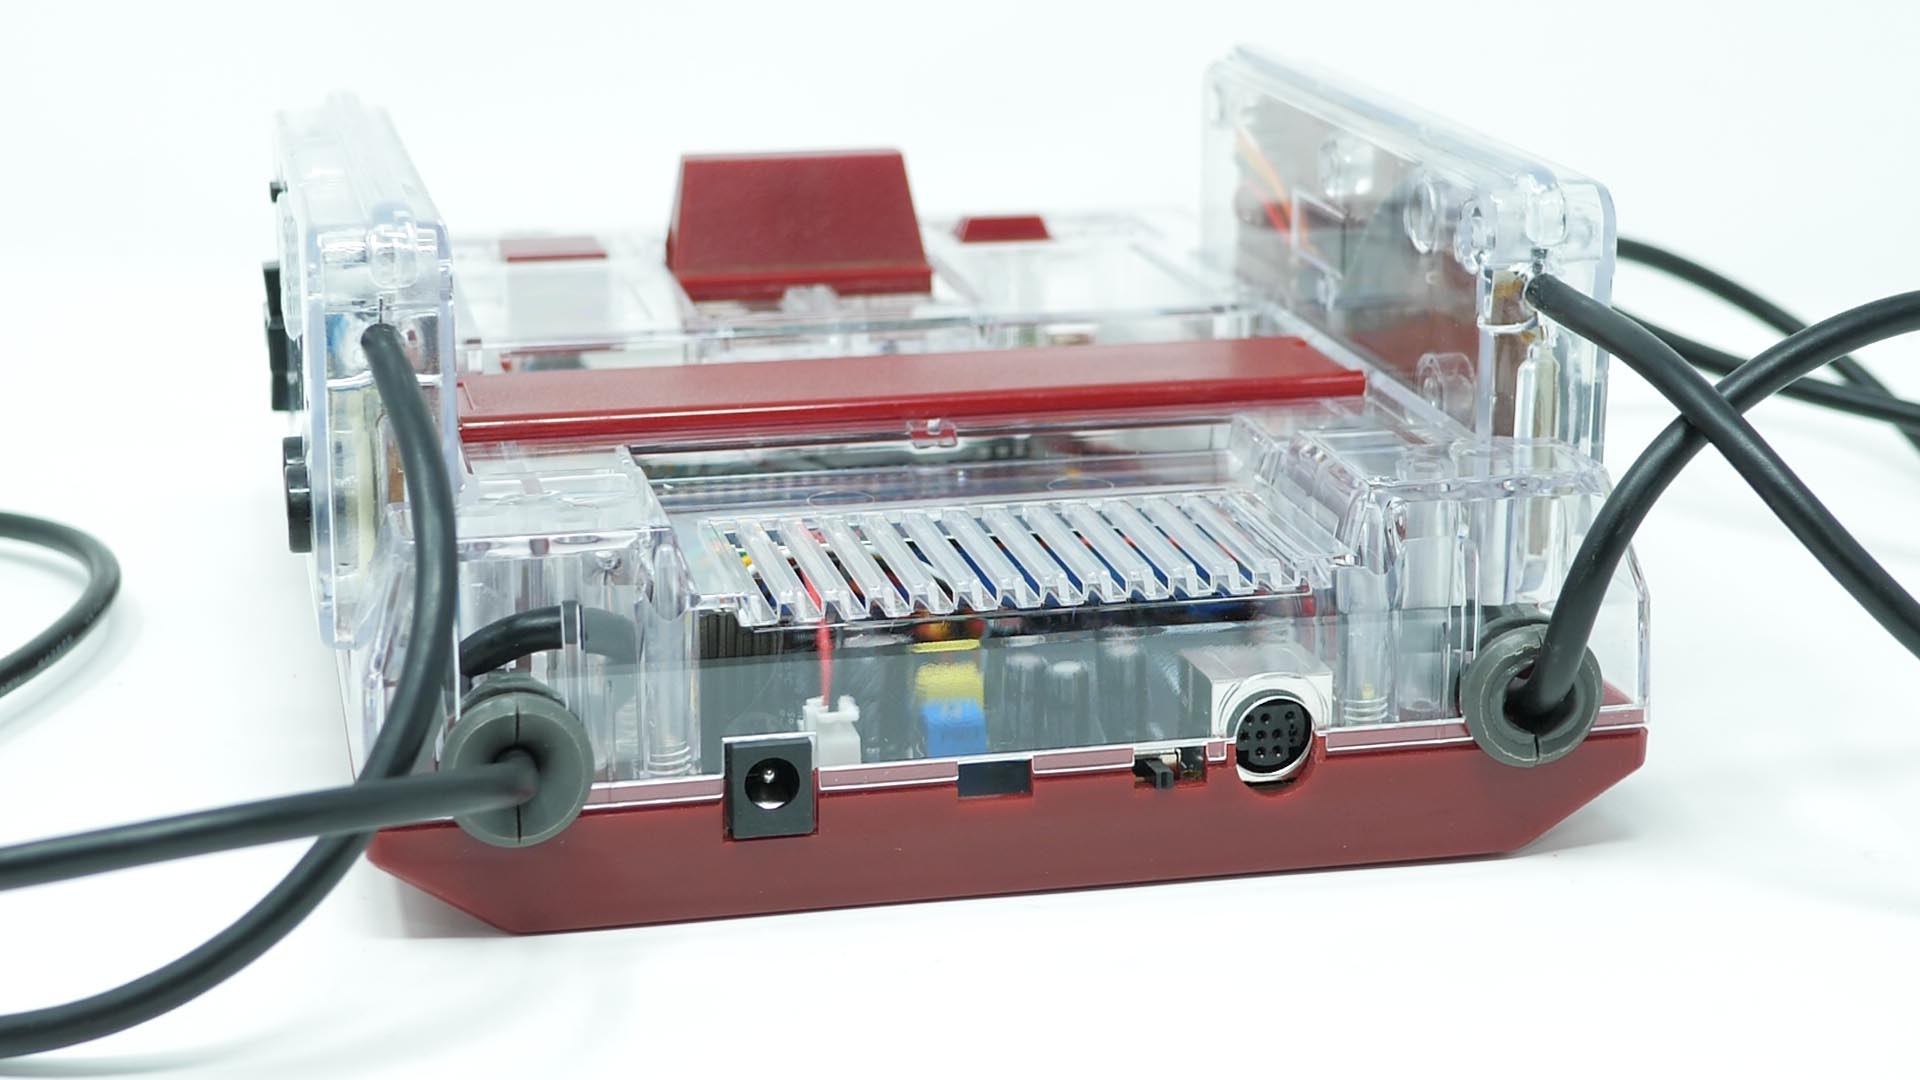
The first thing to discuss is the rear board. If you want to upgrade from the existing RF-only board to composite video, or if you’re doing an RGB mod, this is absolutely the board I’d recommend. While the Backoffice board I previously tested was good, Retro Game Restore takes it to a new level: Multiple output options, easy pads for upgrading to RGB and an amazing audio effect that even integrates Famicom Expansion audio built right in. There’s a few things to note before your purchase though…but all are GOOD things to note!
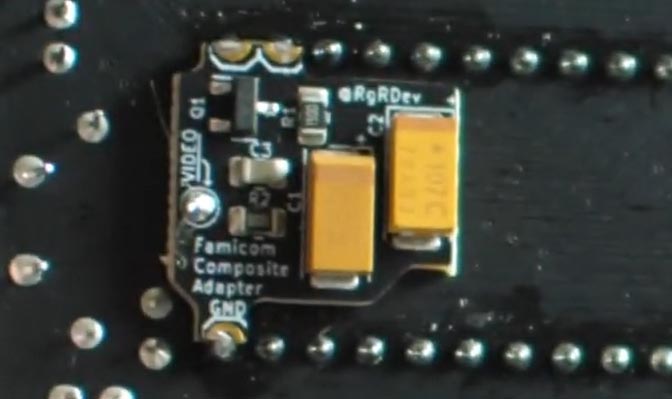
Composite Video Bypass
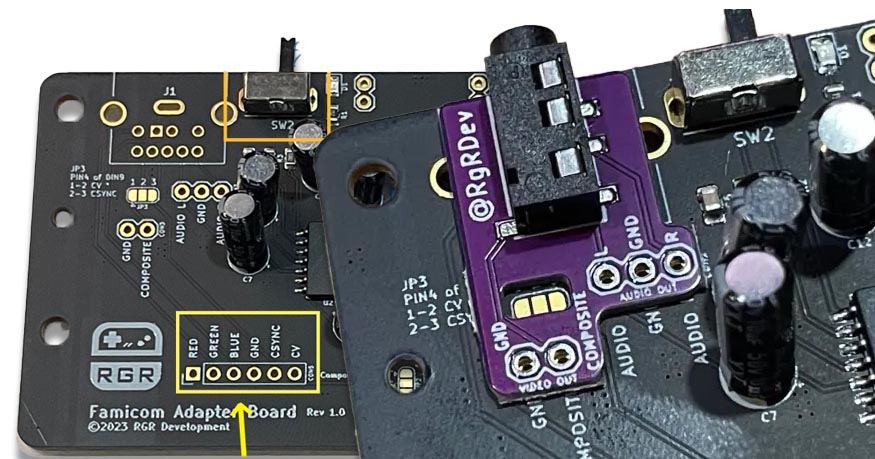
First, if you’re going to be keeping composite video as your main output, you absolutely want to add the $8 composite bypass board as well. It’s a quick-solder board that will work with all top-loading Famicom motherboards – You’ll have to remove a component or two on the original Famicom motherboard to disable the original composite video signal (instructions are on the website), but it’s absolutely worth it! Then just run one single wire from there to the replacement rear board:
The results were far more impressive than I expected. In fact, this is the Famicom I previously used to use as a “bad composite video” example. Even swapping the RAM (a few years ago) and the motherboard (more on that later) didn’t make the same difference. Check out this comparison shot for proof, as well as the livestream below:
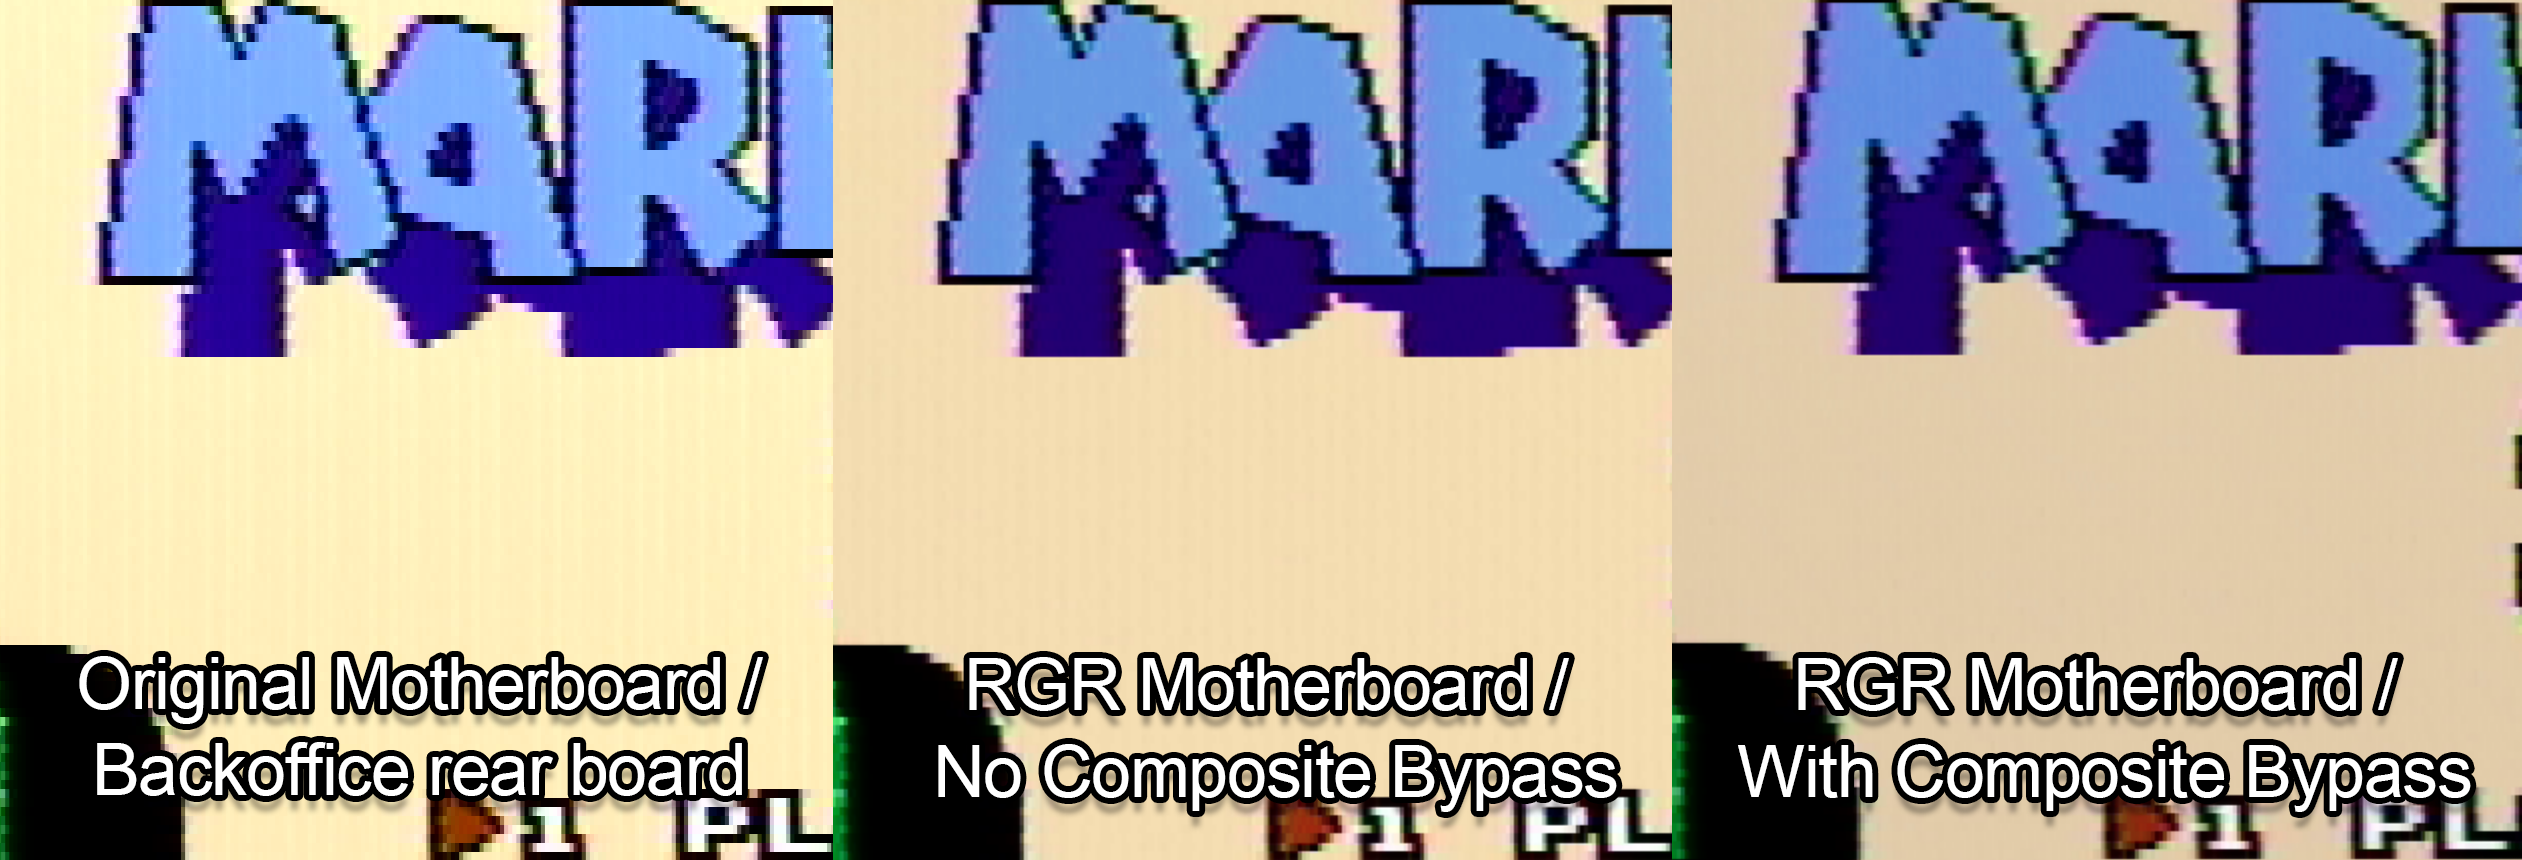
Note that the new rear board and even the replacement motherboard couldn’t fix the jailbars. My guess (100% speculation!) is some PPU revisions are just noisier than others and require the signal to immediately be pulled away from the chip, as shown in this bypass. And once again, please check out the livestream below for more examples. I’m pretty sure you can use this even with the original rear board, but I think you should seriously consider that as well…
Rear Power / AV Board
Next, I want to talk about the rear board itself, as there’s so many options. I’ll show closeups of everything, but here’s the basics: It comes with two wiring harnesses – One for the power switch and the other to connect to the main board. The jumper JP2 is required if you’re using composite – You need to select if you’re using the input from the motherboard, or the bypass board that I recommend. There’s also via’s if you’re using a NESRGB, that make it really easy to route RGBs:
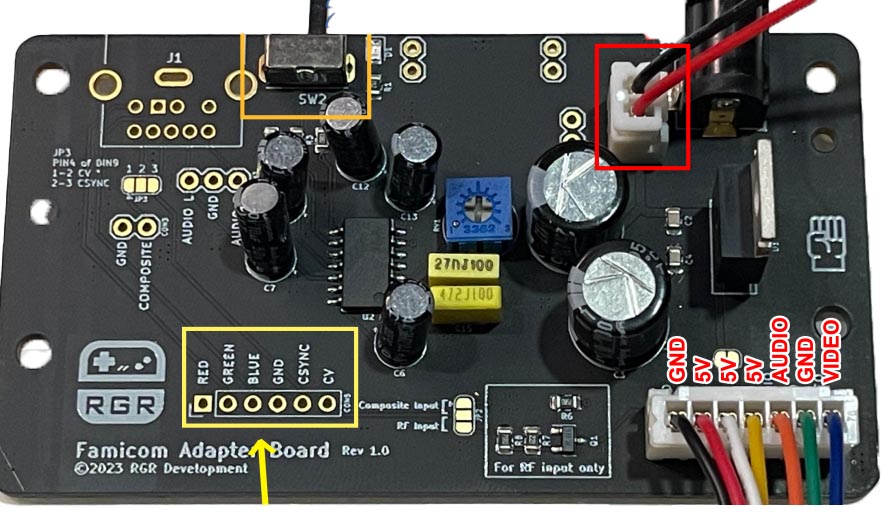
Then you need to decide if you’d like a 3.5mm jack for video output, or a Genesis 2-style MiniDIN. If you’re only using composite video and have an original shell, I strongly recommend 3.5mm. If you need RGB as well, or if you’re using a transparent RGR shell, I’d go with the MiniDIN like I did. If you plan on using composite video, you’ll also need to jump JP pins 1 and 2, regardless of output solution:
There’s also options for USB power, however I always recommend just using a good, Triad PSU and never mix USB with my consoles. The RGR website has plenty of details about using USB power though, if you’re interested in purchasing that upgrade.
The switch on the back, fits through the standard RF switch hole and toggles between standard dual-mono (through both the L&R audio cables) and a “3D surround sound” mode. I tested this in the livestream below starting at the 46-min mark and was really impressed. There’s tons of examples there if you’d like to hear for yourself. While I’m sure “Famicom audio purists” would have an issue with changing the sound, in most cases, I loved it. It even properly routed the Famicom expansion audio!
Replacement Motherboard:
The last thing to mention was the replacement motherboard. It was perfect – Just desolder the CPU, PPU, reset button and controller port jacks, then move them over. If you can’t salvage these, you can get replacement CPU & PPU’s, solder the controller wires directly to the board…and I think RGR is even working on a replacement reset button. The board comes with everything else pre-populated and was a drop-in solution. It even had a pad to route the composite video bypass, making that even easier than it already was.
But if your current motherboard is working fine, you don’t need this.
I mean no disrespect whatsoever to RGR when I say that, I’m just being honest: This replacement board is for people looking to replace a broken one, or for people who have a terrible revision that they’d rather replace than repair. Or I guess you could even try to build a Famicom from scratch using only new parts and used CPU PPU’s?
The one advantage I’ll give it, is a brand new board with brand new components is sure to last longer than a 30+ year old system! But once again, if your system is working fine, maybe spend that money on the clear shell instead? 🙂
Conclusion
If you own a Famicom, you’ll probably want to get this rear board. And if you’re using composite video instead of RGB, you’ll really want to spend $8 on that bypass! Also, I love that clear shell! That’s just preference of course, but if yours is cracked or yellowed, that’s probably a must-buy as well!
