
I recently learned that ScummVM, the emulator for classic PC adventure games like The Secret of Monkey Island, King’s Quest, and Beneath a Steel Sky, has a port for the Sega Dreamcast. This was exciting news to me because I’d been looking for a way to play these games on my CRT comfortably from the couch without adding any more devices to my setup.
After several attempts I found that the existing guides and documentation for setting up what I’ll call ScummVMDC going forward didn’t work. To keep a long story short, they were all missing a single important step required by the most recent versions of ScummVM. Also, some of them were focused on burning a CD since that was the norm when they were written. I have a Terraonion MODE in my Dreamcast, and it struck me that with the proliferation of Optical Drive Emulators, technology like ScummVMDC may be more relevant than ever.
This guide will bring together information from several sources and hopefully serve as a modernization and somewhat future-proof version of the required steps. The guide is currently meant for Windows 10, but I will write more about Linux at the bottom.
Requirements
- ScummVM (I’m currently using 2.5.1)
You’ll need to navigate to https://www.scummvm.org/downloads/ and look for “Dreamcast Plain Files”. This won’t be linked directly because such a link may become obsolete once a new version of these files is generated. - Games
One or more games that you can run in ScummVM. Compatibility with the dreamcast will be quite complex. Your mileage may vary. In general, I’m assuming that the more modern games supported by ScummVM will not work, but please let me know if you find any that do. I’m especially curious to try Blade Runner.
Some of these games are available on GOG, and some of the original versions are on archival sites around the web. However, no matter where you get them, the games are likely to have a bunch of additional stuff with them you don’t need. Fortunately, the ScummVM Wiki will tell you exactly which files you require. Navigate to this link:
https://wiki.scummvm.org/index.php?title=Category:Supported_Games
From here, you should be able to find the title you’re looking for. Click on it and look for the “Required Data Files” section. There you should find a list of the files that you actually need to run the game. You’ll have to extract these files from the copy you’ve downloaded and stick them in a folder (I suspect that if you leave additional stuff in it’s fine, but it takes up more space). Sometimes there will be additional instructions in this section, so be mindful of those. Also, sometimes entries in the required files list will have one or more asterisks (*). This is a “wildcard”. It means that you want all the files whose names contain the characters before the asterisk if it’s at the end, or after the asterisk if it’s at the beginning. This goes for the names and the file extensions, so you may need to turn on visible file extensions in Windows Explorer. - A Dreamcast Memory Card
ScummVM uses the Dreamcast’s VMU or memory card to save your game. Only necessary if you want to save. - BootDreams (I’m currently using 1.0.6c)
The Dreamcast likes images in the .CDI format, and this is one method of creating them. I don’t know if this is the only method, and I’d love to find another. One reason for this is that I’m linking you to a .EXE file, and your browser or Windows will most likely refuse to download it on the grounds of its being a virus.
I want to make it clear that I in no way vouch for the safety of this executable. All I can say is that I’ve been using it for some time now and haven’t had any problems. Additionally, this is from the location linked to, by way of its creator, dcemulation.com, in ScummVM’s official documentation. This application was created by the Dreamcast community a long time ago, likely before these antivirus protections were even created.
To get around the antivirus block I followed these steps on Windows 10:- Click the Windows “Start” button
- Click on the “Settings” cog
- Click on “Updates & Security”
- Click on “Windows Security” in the side panel
- Click on “Open Windows Security”
- Click on “Virus & Threat Protection”
- Click on “Manage Settings”
- Turn off “Real-time Protection” and “Cloud-delivered Protection”
Now you can download the file here, if you accept the risk: https://storage.googleapis.com/google-code-archive-downloads/v2/code.google.com/bootdreams/bootdreams_106c.exe
Remember to turn the antivirus settings back on after downloading!
To alleviate the necessity of these steps, I’d love it if someone knowledgeable about creating .CDI’s for the Dreamcast could suggest some alternative software to try out. Additionally, the source code for BootDreams is available so we could see if it’s doing anything particularly special, or wrap it an an .MSI: https://storage.googleapis.com/google-code-archive-downloads/v2/code.google.com/bootdreams/bootdreams_106c_src.zip
Procedure
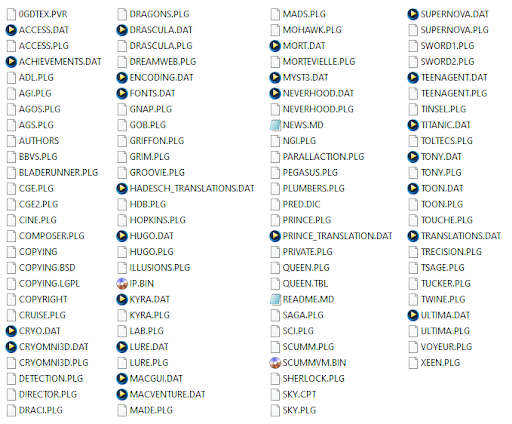
- Extract the ScummVM Plain Files to its own directory
The contents should look something like this:
- Create a CDI subfolder
We will now create the folder that we will shortly be turning into a .CDI file. Anything in that folder will be written to the .CDI file, and we don’t need most of these files. For the sake of simplicity, let’s create a subfolder here and call it “CDI”. - Copy the ScummVM files you need to the CDI folder
The main files we need are “IP.BIN” and “SCUMMVM.BIN”. Copy and paste those to the CDI folder.
All of the .PLG files are actually plugins for ScummVM. Games for different engines (by different developers: Lucasarts, Sierra, Activision, etc) require different plugins. For our purposes, we’ll focus on LucasArts games since they’re simple to get working. Here is a list of engines matched to games, which should help correlate them to .PLG files (“AGI.PLG” and/or “SCI.PLG” for Sierra, “BLADERUNNER.PLG” for BladeRunner), but there isn’t much documentation on this specific to Dreamcast: https://wiki.scummvm.org/index.php/Engines
We’ll need “SCUMM.PLG” for LucasArts, so let’s copy that to “CDI” as well.
Lastly, you’ll want “DETECTION.PLG”. This plugin detects the games that you’ve included on the disk. Originally this application was intended to simply boot other disks that you’d burned games onto. It can still function that way. However, with this plugin you can select from a list of multiple games that you’ve burned to a single disk instead which eliminates the need for disk swapping, and in the case of ODE’s, disks altogether. As far as I’m concerned this is far more useful and so I won’t be talking much about how to burn games to their own disks. Go ahead and copy “DETECTION.PLG” to the “CDI” folder. - Put the plugins in their own subfolder
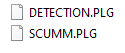
Create a subfolder inside of “CDI” called “PLUGINS”. Put all your .PLG files (“DETECTION.PLG” and “SCUMM.PLG”) inside it. This step was added in ScummVM version 2.5.0. - Put your game files in their own subfolders
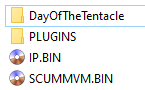
Each game should have its own folder inside the “CDI” folder. Inside, you will place the required files we looked up earlier.
Your “CDI” folder should now look like this, but can contain multiple game folders:
And your “PLUGINS” folder should look like this:
- Create the CDI with BootDreams
Install BootDreams through the executable you downloaded earlier and Launch it. You’ll see three inputs:
Click on “Browse” next to the “Selfboot folder” input and navigate to your “CDI” folder.
The “CD label” input shouldn’t really be important, but I called it “ScummVMDC”.
Keep “Disc format” as “Audio\Data”
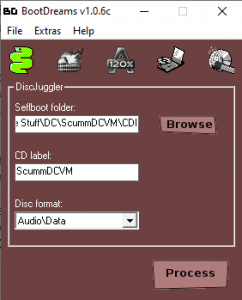
Click “Process”
BootDreams will ask if you’re sure, click yes.
Sometimes BootDreams has asked me to specify the “main” BIN file or something similar. I just clicked on “SCUMMVM.BIN”. This shouldn’t be an issue.
You’ll now have to specify where you want to save the resulting .CDI on your filesystem.
After a loading bar, which can be long depending on the size of your games, you should now have a CDI file. - Load it onto your ODE or burn it to a CDR
I’m using a MODE with an SD card so I created a folder called ScummVMDC on my SD card’s “Dreamcast” folder then put this .CDI file into it just like with my other games.
Since I don’t know about other ODE’s you’ll have to refer to their documentation, but it should be the same as loading any other game.
As for CDR’s I’ll have to refer back to ScummVM’s documentation which suggests the use of DiscJuggler, Nero, or Alcohol120%. I seem to remember these being the norm for burning any Dreamcast CDR’s.
It’s worth noting that some people have reported benefits to using “Dummy Files”. My understanding is that these are files filled with junk data meant to take up space in the .CDI file so that it’s about as large as a CDR’s capacity, 700MB or so. This may be beneficial to CDR users, but I haven’t had any issues without it on the MODE. BootDreams will create one for you if you navigate to Extras > Dummy File then select the size of your CDR. - Boot ScummVMDC on your Dreamcast
If everything’s working, you should see a short loading bar after the regular Dreamcast splash screens during which the detection plugin is detecting your games. If no games are detected then you’ll see a screen that prompts you to insert a game disc. If you have a game disc compatible with ScummVM you can supposedly swap it in then. If your games were detected successfully then you should see a list of them. Navigate with the joystick and select one with A to begin.
You can find a list of controls here: https://docs.scummvm.org/en/latest/other_platforms/sega_dreamcast.html#controls
You’ll have to navigate to ScummVM’s menu with the start button to save to the VMU. Left trigger pulls up the on-screen keyboard.
.CDI Size
If you’re burning a disc, then you’ll want to keep the total file size of your .CDI under the file size of your CDR. However, I’m curious about how large you can go using an ODE. Perhaps the Dreamcast’s RAM will limit the file size of the .CDI it runs, but someone more informed will have to answer this. I’m sort of hoping I could just stuff several entire libraries into one .CDI on my ODE, but that just seems too good to be true. Also, the loading times seem to be longer depending on the size of the .CDI file. Because of this I’ve created a LucasArts.CDI and plan to create different ones for other developers.
Also, I did test putting Lighthouse: The Dark Being on a .CDI by itself. I was able to complete the process normally, and after a few long load times the game booted. It even played the entire intro cutscene flawlessly from what I could tell, but it crashed before loading into gameplay. I suspect this may also just be a compatibility issue, and it seems like a promising result. I’ll keep testing.
Linux
There is a documented process for creating a working CDR on Linux. I am a huge Linux nerd, but I don’t know enough about the CD stuff to remove it from this process and just create a .CDI file instead. If anyone could help with that I’d greatly appreciate it because it would likely eliminate the need to use BootDreams.
The relevant information is here: http://mc.pp.se/dc/cdr.html
Thank You’s
The only thing I actually did to make this possible was bug people to get the information I needed to write this document. Thank you to:
- Marcus Comstedt
- kremiso on the ScummVM forums
- digitall on the ScummVM forums
- The ScummVM Discord
- Dreamcast.nu
- Northern Lights Retro Gaming
- Dcemulation.org