Proper scaling (and aspect ratio correcting) is extremely important when presenting “historical” representations of pixel art. Any historian presenting footage (or screenshots) need to try their best to get it right, as anything else might mis-represent how these games actually look. We’ve already seen the negative effects of improper presentation – How many people think Mario is really thin with soft artwork, since people make videos showing square pixels badly scaled!?!?!?
Luckily, EposVox aka The Stream Professor just released a video that details how to use Davinci Resolve to nearest-neighbor scale retro game footage. This is extremely helpful, as Resolve is completely free and a great tool for most people to use.
Epos also showed how to use a free program I’d never heard of (but am excited to try) called StaxRip: https://github.com/staxrip/staxrip
Also, with all respect to the Stream Professor (who’s videos and help behind the scenes completely transformed my videos and streams!!!), I have much easier ways to scale using the two other pieces of software he showed. Let’s start with the easiest…
Adobe Premiere:
If you use Adobe Premiere, simply install the FREE plugin Vizual PixelPerfect from Autokroma (the same way you’d install any Premiere plugin): https://www.autokroma.com/blog/Vizual-PixelPerfect-Upscale-Pixel-Art-Nearest-Neighbors-Premiere-Pro
Then I usually access it by searching for “viz” in the effects window and dragging it on top of the clip I’m looking to scale. You’ll see the option appear, then just make sure “Nearest” is selected and choose your integer:
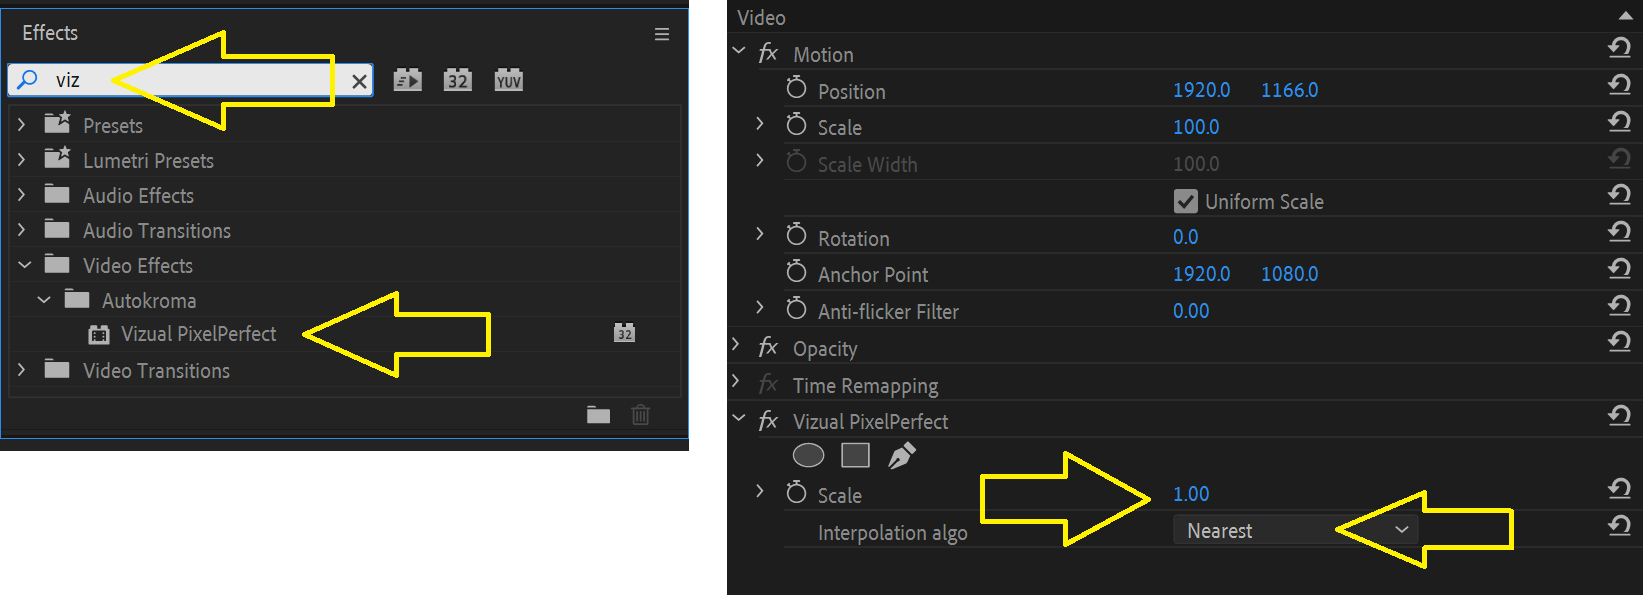
Sometimes that’ll line up and be easy, as with scaling 1080p from something like a MiSTer to 4K – Simply select an integer of 2, to double 1080 to 2160. Non-integer scaling can be tricky though and scaling 480p is a good example. You can select an integer of 5, to sharp-scale to 2400 and simply crop the top and bottom. Sometimes this actually ends up looking exactly like CRT overscan (especially with 240p -> 5or10x), but there’s one thing to note: You can center the image in Premiere without any issue, but if you’re using the crop tool, move it above the “Vizual PixelPerfect” fx you see above. Don’t worry though, if you drop “crop” and the image gets messed up, simply drag it above and it’ll go back to normal.
But what if cropping won’t work for you? Sure, you could always sharp-scale 480p 4x to 1920 and add a frame to fill it to 2160 (or whatever you’re trying to scale to). In fact, that’s often a great way to do it…but isn’t always the best option. In that scenario, I’ve found scaling past the target resolution and scaling down looks better. To clarify using the same 480p -> 4K example: Sharp-scaling 5x to 2400, then using your video editor’s scaler to “shrink” the vertical down to 2160 often looks better than sharp-scaling 4x to 1920 and using Premiere’s scaler to “stretch” to 2160. Same if you’re pre-scaling footage, which we’ll talk about next.
Using VirtualDub to Pre-Scale:
If you’d like, instead of scaling in your video editor, you can pre-scale any captures, then just drop them in your timeline. This is great if you plan on using the footage in multiple videos, as you only have to do the editing once. VirtualDub is free and can both scale and aspect-correct very easily. Rather that re-type everything here, I’ll refer you to a page and video I already did on the subject. The video below walks you through it at about 25:45 and this page has the same info in written form with screenshots: https://www.retrorgb.com/virtualdub.html
