Direct video is a method of outputting an analog video signal through an HDMI port. It is supported by the MiSTer FPGA and gives users an alternate option to connect their setup to an analog CRT. The more popular method to connect to a CRT is using the official MiSTer FPGA analog IO board, but with direct video you gain the ability to use a second RAM module for cores that need extra bandwidth. However, with direct video, you will lose the ability to output an analog and HDMI signal at the same time, which is great when capturing video or streaming online.
If you made the decision to use direct video because maybe a core would require dual RAM, here’s what you need to set it up:
- You will need a supported HDMI to VGA DAC.
- For RGB, you will need a VGA to SCART cable or a VGA to BNC cable.
- For component: VGA to component cable.
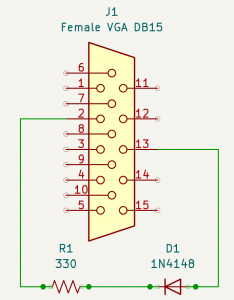
- For component, some adapters need a sync on green mod and that requires:
- A 330ohm resistor
- A 1N4148 diode.
- A stereo 3.5mm to RCA audio cable
- If you want to avoid modding, Laser Bear Industries has an adapter with the SOG circuit built-in (Linked at bottom of article).
There are links at the end of the article for all the needed items.
If you have a DAC that needs the sync-on-green mod, the below image shows you what you need to do. Also the video link in this article guides you through the process.

Additionally you also need to modify your MiSTer.ini file to enable direct video. I recommend using a fresh ini file from the MiSTer FPGA github. I had issues with my original INI file that I had been modifying over the years. The modifications for the ini file are:
- For RGB & Component
- direct_video=1
- composite_sync=1
- For component only
- vga_mode=ypbpr
For some adapters, you may have to set the HDMI range because they don’t produce Full Range RGB. In those cases, you will need to set the hdmi_limited value to one of the Limited Ranges below. On the adapter I used (Rankie linked below) I set hdmi_limited=2.
- Full Range (0-255): hdmi_limited=0
- Limited Range (16-235): hdmi_limited=1.
- Limited Range common DAC variant (16-255): hdmi_limited=2
After everything is done, just connect the adapter to the HDMI port of the MiSTer and the RGB/Component cable to the VGA port of the adapter. Then plug the video and audio cables to your television and you’re done.
If you’re interested in getting information on the quality of different DACS, there is a document by @kurohouou that has test results for different DACs, it will help you better make a decision on the DAC to buy.
Items I used (Affiliate links):
- HDMI to VGA DAC by Rankie(Needs Sync-On-Green mod for component): https://amzn.to/3tE0ALb
- VGA to component cable: https://amzn.to/46MTBOu
- Diode (1N4148): https://amzn.to/46AhSrl
- Resistor (330 ohm): https://amzn.to/3tw2OMX
- Stereo 3.5mm to RCA audio cable: https://amzn.to/3QomLOM
- IFixit kit: https://amzn.to/3F35qUX
Document by Kuro testing other HDMI to VGA DACS
- Full Technical Document: https://tinyurl.com/dacanalysis
- Test Results: https://tinyurl.com/dactestresults
- RetroRGB Article: https://www.retrorgb.com/hdmi-to-vga-dac-analysis.html
Other compatible DACs (sourced from MiSTerFPGA Github documentation):
- ISY IAD-1007, HDMI Adapter: https://www.mediamarkt.de/de/product/_isy-iad-1007-hdmi-adapter-2737565.html
- HAMA HDMI™-Stecker auf VGA-Buchse, Adapter, 0,15 m: https://www.mediamarkt.de/de/product/_hama-hdmi%E2%84%A2-stecker-auf-vga-buchse-2708216.html
- HDMI – VGA-adapter https://www.jula.se/hdmi-vga-adapter-003087/
Laser Bear MiSTer Direct Video to Component adapter
VGA to SCART/BNC cables for MiSTer from RetroAcces (These are recommended by the MiSTerFPGA GitHub documentation)
MiSTer FPGA fresh ini file
Direct Video documentation